A Step-by-Step Guide to Add & Change Text Color in Pixlr Editor
Step#1 (Open Pixlr Editor)

Open Pixlr — go to Pixlr Editor.

You can start by creating an account, but if you already have, then you can sign in & go ahead. On the other hand, you can simply upload an Image from your computer through click on ‘Open Image’.

I uploaded an image to which I want to add eye-catching words. Let’s jump into the next step (Step 2).
Step #2 (Add Your Text)
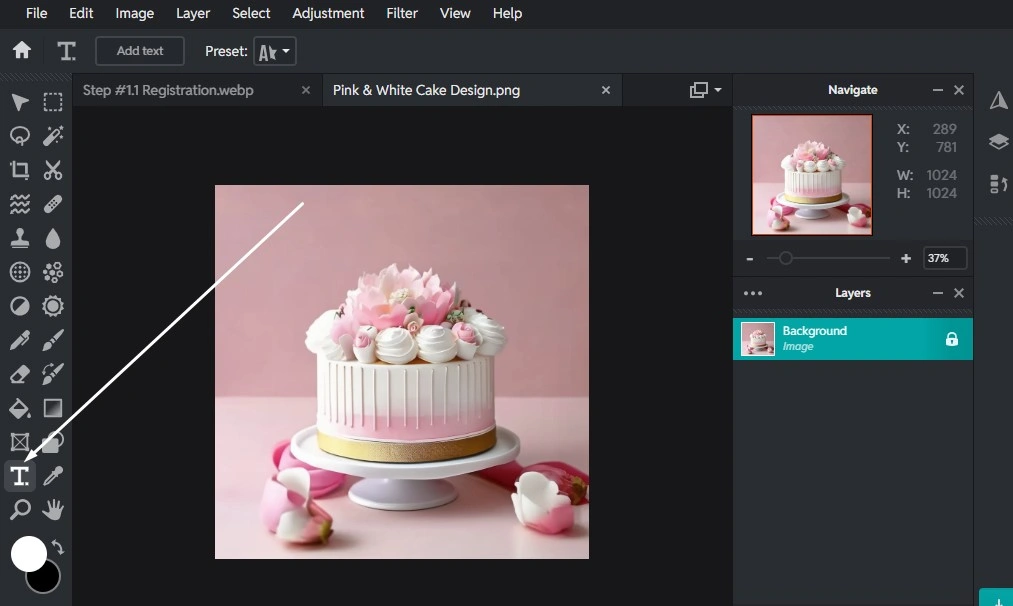
Now, it’s time to add text to the image. To do that, look at the left sidebar menu and find the ‘T’ symbolled tool out among the crowded toolbox, which is the main tool we need for this project. Follow the Screenshot.

Click on ‘T‘. Afterward, on the top, you’ll find 2 options visible: ‘Add Text’ & ‘Preset’. You can add your words by clicking Add Text or by Preset.
Alright…!! Let’s see how to add text through the ‘Add Text‘ option.

When I clicked on ‘Add Text‘, I got the option to type my words. You may see in the above screenshot that I have already added my text. Now, I’m going to drag the Text box and drop it in the right place for perfect positioning. I would like to drop it at the top of the image.

Now, look at the top menu bar, where a row of options is placed for customizing the texts. Through these options, you can change font, Text Color, Size, Text format & style. But our core mission of this guide is to teach how to change color in Pixlr — So let’s change the color.
Step #3 (Change Text Color)
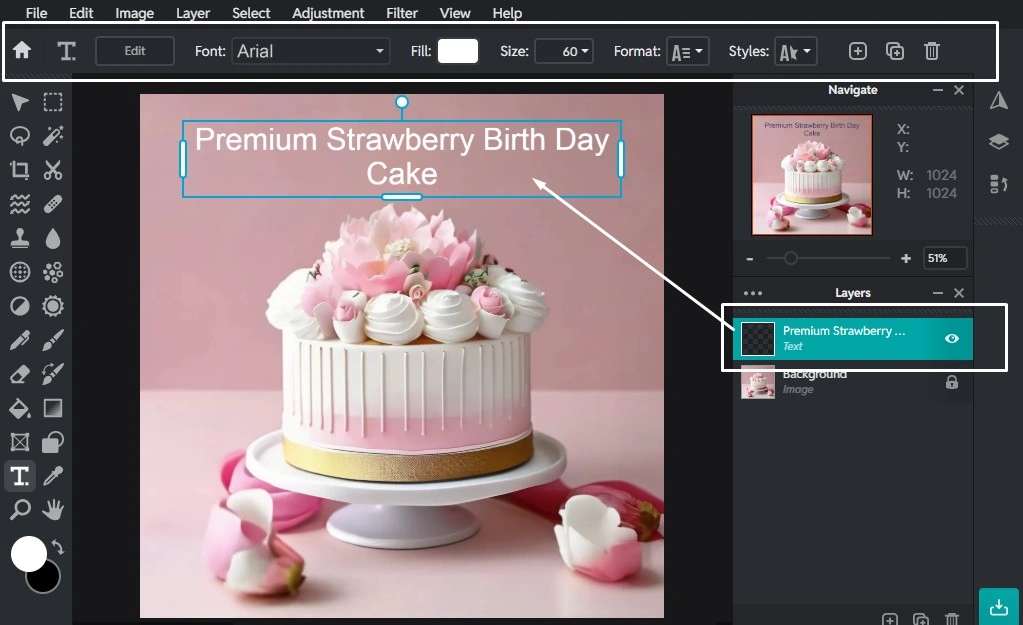
To change the text color, make sure that the added text layer and the ‘T‘ tool are selected. Otherwise, you won’t see the customization options. To select texts, simply click on your written texts — the text layer will be selected.
Afterward, focus on the customization options. Here is an option called ‘Fill‘. Check on the Screenshot — the white color is selected, which is the current text color on this image. Let’s change it.

To change the text color, click on ‘Fill‘. You will get some options – Color, Gradient, and Pattern.
If you want to change to a single color, then choose the ‘Color‘ option. Or, if you want to change to a gradient color format, then click on the ‘Gradient‘ option and change the color. If you want to add a pattern instead of just color, then choose ‘Pattern‘.
As I prefer to change to a single color, so I selected the ‘Color‘ option. From the displayed color plate, I chose my preferred color, and to apply the changes, I clicked on ‘Okay‘.
You can add your preferred color from the color plate. Also, you can add your preferred color by placing the color code in the box.
However, you can also select a color from your current editing image through the ‘pen symbolled tool ‘. Look at the screenshot – after the color plate, a color code placement box is located, and next to it, a pen icon is – which actually works to select a color from the current editing image.
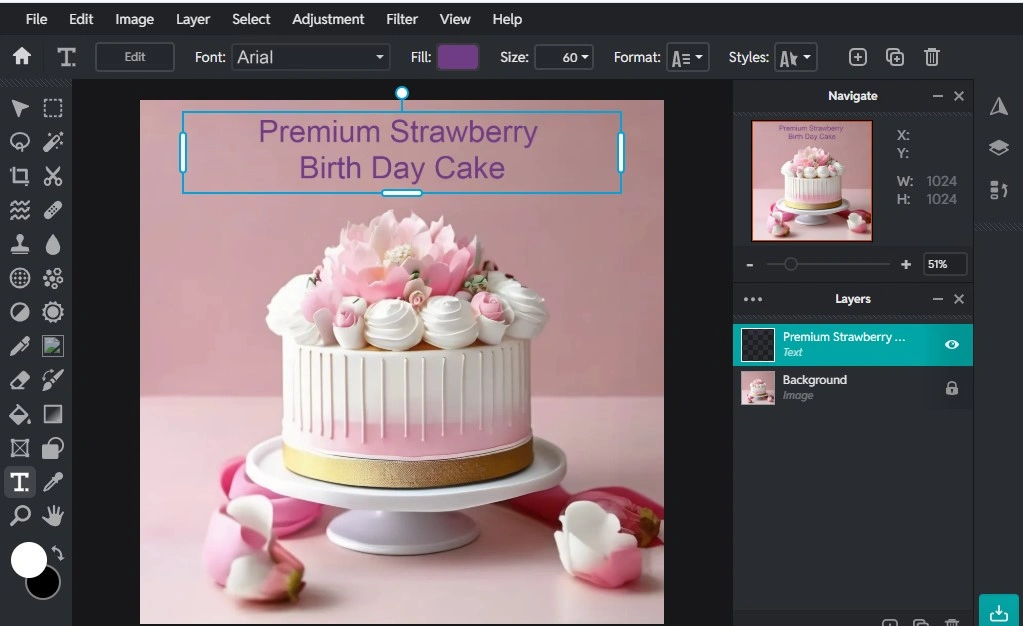
Here is the result. I changed the color to my preferred one. But I think I need some extra editions on the texts. Let’s do it in the next step. However, you can skip it if you think you do not need to follow more.
Step #4 (Customize Texts)

I did a little bit of editing on this image. I changed the Font and made the Text Bold for this transformation. You can also do the same.
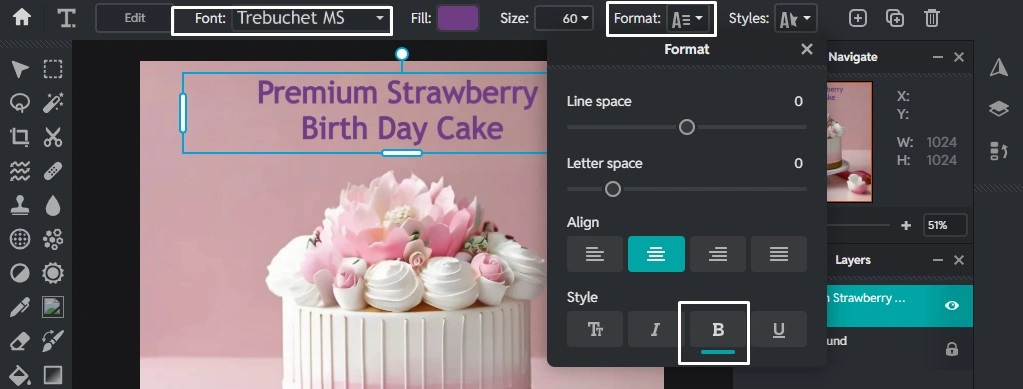
Make sure you select the Text layer and can see the customization options. From the row of customization options, click on ‘Font’ to change the font. And, there is also a ‘Format’ option available. Click on Format > Style> B (Bold).
My edition is completely done. Now I’m going to download it.
Step#5 (Download Edited Image for free)

Look at the Right-bottom corner; here is an option for downloading the edited file. The option is named ‘ Save as‘. When you click on this, you’ll see another interface.

Pixlr will ask you to download the image from any of these 5 options. You can download it in JPG, PNG, Webp, PDF, or PXZ file format. Additionally, you can measure the width and height of the image, also adjust the quality of the image. After that, simply click on ‘Save as‘ to finish the download process.
Hope you learned properly the process of how to change text color in Pixlr Editor. If you have any questions about Pixlr, you can ask by contacting Tech-Lite Blogs.